Sunday, October 13, 2013

I have a wheel!!!!

Recently I acquired a pottery wheel.  Yea me.  And now I am trying to learn to use it.  Metal working hubby made me a special stool to use with it.  I took a wheel class to learn the basics of centering.  The whole thing is to slow down and work with the clay, not against it.  Still working hard on centering.  So I made my 1st batch and posted a photo on tumblr.  Comments were to have better bases, since it's my 1st batch I was happy.


So now I am merrily attempting to throw stuff and turn it into something more interesting than a basic bowl.  Gotta get the basics down 1st before I can move on to so now need to practice. My new practice piece will be Chawan Tea Bowls so it will be fun to see how those will turn out.  I figure it will help me develop a bowl and learn to trim etc.
 I used a thrown bowl as the base for these little fairy houses.
Also I started pinning craft ideas onto my Pinterest boards so that seems to be a better place to put ideas like that.  You can now also find me on Facebook

Saturday, September 14, 2013

Leaf crafts while ya got them

The leaves are falling, get them quick.  What to do before all the leaves are gone.

Leaf printed table cloth: You will need leaves (of course), cheap paper tablecloth from dollar store, brushes, and acrylic paint. 
Paint the backs of the leaves where the veins are raised, turn over and stamp allllll over the cloth.  Let dry and have a special cloth made by the kids.  You can also use fabric paint on a cloth table covering for a permanent hand crafted idea.

Googly Eye Leaf Stick: Supplies - Wooden ice cream spoon (alternatively a popsicle stick would do); Silk fall leaves or Collect real leaves; White craft glue; Crayons or paints; Googly eyes.
Color or paint the wooden spoon (or popsicle stick). Glue leaf to the stick (if you use real leaves coat them with glue and let them dry before gluing to the stick) Add eyes to leaf by applying to small dots of glue, allow to dry completely.
(source: FreeKidsCraft)


Leaf bowl
Supplies - air dry clay or polymer clay, paint, leaves from the yard (of course), brushes.
What to do - roll out your clay to about 1/4 inch.  Old wooden rolling pin works great for this.  Press
leaf into clay with veins down to get best imprint.  Using a needle, clay tool, or unbent paperclip cut out around the edges.  Line a small bowl with plastic wrap, then press clay leaf down into bowl.  Let dry. For polymer clay once set bake in oven as usual.  Once baked or dried paint the colors you think it should be.  You now have a small leaf bowl.


Great places to look for crafts are or course ye ol Pinterest.  Love that site.


Monday, March 25, 2013

Eggstravaganza

Easter-eggs-hanging-from-001

It's that time of year again. Time to get out the eggs and start decorating. Ok, so I'm a little late and you have probably already done your eggs but what the heck, thought I would share some cute ideas that are a bit above the ol' just dip'n'dye method. So here are some nice sites with tutorials for some different eggs.

Leaf print eggs - for these eggs you simply press a design to the egg, like a leaf of possibly a cut-out, wrap in panty hose and dye. The covered area will remain white and leave a pattern.
Doodle eggs - you can dye the egg and then draw patterns on them with a magic marker. Create some nice primitive designs.
Embroidery floss eggs - you have seen the neat spheres on Pinterest that are twine over a balloon. This is just a smaller egg-shaped version. They make a very nice hanging decoration.


MOD-PODGE - of COURSE you can cover the eggs in everything from glitter to pieces of fabric. This site has a listing of many ideas.
making-a-faux-faberge-eggUkranian Eggs - these are the detailed eggs that use a combination of wax and dye. This site includes a brief tutorial to understand the concept. You can then make your eggs as detailed or simple as you like. Personally if I ever find the time I would really like to try this out.
Faberge Eggs - A little glue + all the nifty cool stuff at craft stores and you can make your own egg fit for a Czar.
 
So get out there and have some fun making eggs that are a bit off the beaten path.

Sunday, March 17, 2013

St Patricks Spa Day

Celebrate the luck o’the Irish by treating yourself to a St. Patty’s day spa day. Here are some Irish and Green ideas to pamper yourself with.


irish-cream Irish Cream Sugar Scrub -
Sugar: 1 cup
Dry Milk: 1 tbsp
Coconut Oil: 1/2 cup
Peppermint Oil: a couple of drops
Green Food Coloring: a couple of drops
Mix together and package pretty!


"May the road rise to meet you,
May the wind be always at your back,
May the sun shine warm upon your face,
The rains fall soft upon your fields and,
Until we meet again,
May God hold you in the palm of His hand.”
 
Milk & Honey Facial Mask -
This recipe will make about two masks
1 egg (full of proteins,vitamins A,D,E ,tightens the pores, softens skin)
2 TBL powdered milk or whole milk (nourishes skin, lactic acid, hydrates,anti-aging benefits).. 1 TBL honey (protects from sun damage, antioxidant, absorbs impurities, antibacterial, great cleanser.
“May you have warm words on a cold evening,
a full moon on a dark night,
and the road downhill all the way to your door.”
 
 
etch candleIrish Blessing Candle
Using a glass candle holder you can decorate it with a quote of your choice
How to mod podge a quote to candle holder
You can print the quote on decorative paper and tie around candle holder
You can also etch glass holders.
Put a green candle in with the scent of your choice and relax.


“May you always be blessed with walls for the wind.
A roof for the rain. 
 A warm cup of tea by the fire.
Laughter to cheer you.
Those you love near you.
And all that your heart might desire.”
 
Bath Salt Recipe. So relaxing and also great for gifts.

Supplies:
homemade-bath-salts-recipe-01 4 cups Epsom salts
2 cups sea salt - fine
10 drops bergamot or orange essential oil
15-20 drops lavender essential oil
2 Tbsp. dried chamomile flowers
Green food coloring


Directions:
Mix salts in a bowl, then add essential oils and food coloring (start with 8 drops or so and add more as needed). Then mix in chamomile. Package in cello bags or canning jars. Use 1 cup of salts per bath. Enjoy!
Have a very Happy and relaxing St. Patty's Day

Thursday, February 28, 2013

Disney Princess Half Marathon 2013

Well I am happy to say I completed my 1st Disney Half-Marathon, my 4th half all together. This was a very fun run so I'm putting a little review of the joys to be had at Disney. The background - I am a casual runner who has done a few half's. I normally finish about middle of the pack; longest run was 2:15. For this run I purchased one half-marathon, and one Gold Chear Squad for the hubby. No other goodies and we stayed off -site. So on to the review:

DPHM ExpoThe Expo:This was held at the Coronado Springs Resort conference rooms. To get to the resort we parked at Downtown Disney and were shuttled to the expo. There were continuous shuttles so this was great, and Downtown parking is free. The line to get in was very long but moved quickly. At the entrance you printed your waiver and then lined up for the bib. NOTE: Disney has LOTS of lines, but they do move. You got the bib and then had to go across the room to get the swag bag, this part I wasn’t fond of, seemed too many lines. There were a lot of typical race booths, I admit I didn’t shop hardly at all, just to many people jammed in a small space. The RunDisney merchandise was in a small section off to the side, it had a huge line to get in so I didn’t bother. Overall review – it should have been held in a larger space.

DPHM 2013 swagThe Swag:In my bag was one Disney shirt, nice fit. One net bag, a large button for the half-marathon, a temporary tattoo, and a small luna bar. That was all. The coupons were digital, no gel samples, no biofreeze samples. I wasn’t impressed.


DPHM 2013 pre raceThe Pre-Race:To get the race for offsite people we drove. You had to be in your corral by 5am and everything said expect long delays. So we got to Disney about 4am, there was a runner drop off bypass so we took that. No long lines, I hopped out and started walking, hubby went and parked. He said the parking was very full but moved nicely so we wouldn’t have had a problem with that. In the starting area they had music, character photo ops, and LOTS of porto lets. I never saw a line for the bathroom, Disney did this right. They announce corral gatherings, you walked a lot to get to where you needed to go. At the entrance they had music, a little show, and eventually, with fireworks, we were off and running. This is a nice casual run, you can do fast if you want but will miss too much.

DPHM 2013 courseThe course:A few rises, no really steep killing hills. You will stop a lot for photo ops. The course is lined with spectators who can get shuttled around. The hubby was at the start, at Magic Kingdom, and at the finish with no problems. There will be many character photo ops, the lines move quickly. If you stop for other photos just step to the side. There were more powerade/water stops than I have ever seen, almost every mile. At each mile is decorative sign and a course clock, many people stopped there for photos.


DPHM 2013 finish
The finish:Mickey & Minnie were at the finish when I got there. Regretfully didn’t hear me call so he left about 2 min before I came through. You stop for your really spiffy medal. Powerade/water at end but you can only take one bottle. Medical with Biofreeze, Tylenol, and ice also at end. The end snacks are in a little box. Disney was very particular about snacks and stuff, nothing at beginning unless you bought a race retreat and they only handed out one box. The snack box was a medley of trail mix type snacks and granola bar.


Overall review:I would do this run again. The changes would be to stay on site, just for park convenience, and take a real camera on the run. My phone photos were not the best. Would not do chear squad, hubby didn’t get anywhere others could get to and weather was great. He didn’t have time for anything else. Princess Half Marathon Gear on Princess Half Marathon
DPHM 2013 Castle

Saturday, February 9, 2013

Year of the Snake 2013

February 10, 2013 Year of the Snake.
chinese new year 2013Since traditional Chinese holidays like the Moon Festival are based on the Chinese lunisolar calendar, the date on the western (Gregorian) calendar changes from one year to the next. This Chinese new year calendar provides dates and descriptions of significant traditional holidays and festivals in 2013, the Year of the Snake, which begins on February 10, 2013 and ends on January 30, 2014.


For people born this year you will be rich in wisdom and charm, you are romantic and deep thinking and your intuition guides you strongly. Avoid procrastination and your stingy attitude towards money. Keep your sense of humor about life. The Snake would be most content as a teacher, philosopher, writer, psychiatrist and fortune-teller.

Now for the advertisement, whee. If you would like some cute wear for this slithery year check out my CafePress designs. A little baby snake with rattle can be found in green, pink, and blue.
It is always fun to make crafts to celebrate the seasons. 2013 is Year of the Snake. So here are some snake and chinese new years ideas.

kid with snakeTo celebrate this year please remember that not all snake are bad and that serve a purpose in life. They keep the rodent population down and are a natural part of the ecosystem. This year is a good time to teach children to be cautious around snakes but not to automatically declare all evil and kill them. Fun snake facts.


Snake amigurmi – I have to admit I love the little amigurumi’s that I see on the internet but so far have been unable to make my own, just don’t have the patience. Here are some cute patterns that are available online.
You can use old fabric pieces to sew into a tube to make your own snake
Using those old plastic Easter Eggs you can make this snake. You can also use an old egg carton.
For interesting food ideas:
Papercraft ideas:
Bouncy Cobra Paper Craft
So have a very happy and safe Year of the Snake, enjoy the fun slithery year.

Saturday, February 2, 2013

St. Brigids Cross

Straw Brigid CrossHappy Groundhog's Day, Imholc, and St. Brigid's Day. Brigid's Cross is an equal-armed cross that is a derivative of the Celtic sun wheel symbol. It is traditionally hung in the home for protection. Making one is fun project that isn't too hard and can be a lot of fun for kids. Traditionally they are made with rushes, wheat stalks, and other grasses. But you can use any straight but bendable material to make your own. Colorful pipe cleaners are great for the kids to use.


Wooden Brigids CrossTo make this cross you will need 14 reeds, some string, and any embellishments you might want to add. The traditional length of the reeds is 12 inches. If you want to make smaller ones to use as key chains jewelry remember the total length across will be the length of your materials. A wonderful tutorial complete with pictures can be found at the Fisheaters website.

Many interesting materials can be used to make these crosses. Recycled materials like magazines and boxes are fun items to use. Here is a tutorial from Gingerbread Snowflakes on how to make one out of cereal boxes.
If you would like to know more about Imholc or the Feast of St. Brigid here are some links.
Enjoy the day and hopefully spring will be blooming in your neck of the woods soon.

Sunday, January 27, 2013

Recycle Valentine's Day Ideas

Recycled Valentine cardWell it's the time of year to think of hearts and candy. So to show your love here are some ideas on how to have and earth friendly valentine's day. Yea Mother Earth.

Recycled Valentine's card. When buying Vday cards look for ones that are made out of recycled materials. Hearts are so easy to cut out of anything so use some old magazines and construction paper and voila - instant eco-friendly card.

winebottle candlesWine bottle re-use. You know you want to have a lovely bottle of wine with that romantic dinner so to celebrate there are many crafts out there that use recycled bottle. One of the simple one is to just cut the top off, fill with wax and a wick, and create a candle. You can leave the label on for extra decoration of remove it and etch the glass.


Give a plant instead of cut flowers. If you have some plants you can make cutting from give a gift from your own yard this year. Cut flowers are nice but they only last so long while a plant for the house or garden can create a lasting reminder of your love.

There are many web sites out there with great ideas like The Blue Chair which has a listing of 50 really cool recycled valentine gifts you can make.

So have a happy and loving Valentine's Day and don't forget Mother Earth when celebrating.

Sunday, December 30, 2012

Taurus Feltie

DSCN0041Once upon a time back in the dark ages when we were children we made gifts for the parents. Then we got older and bought gifts. As time marched on we realized our parents have everything already so are back to the making of gifts. So this year I made a Taurus feltie for my Dad. I used the pattern from Zodiac Felties.


DSCN0042I scanned the pattern page and then enlarge to get a decent size. This pattern was very simple so it didn't take me long to cut out the felt and lay out the pieces for sewing. A simple overhand stitch I can do. The pattern has ribbons on the horns but I went with the simple fabric paint. You could have lots of fun with pattern on the horns. I use gromments and some copper wire to make the nose with rings. Safety Eyes were inserted for some quick and easy eyes that did not involve me embroidering detail. Not my favorite thing. So after waiting on the fabric paint to dry all was put together and I had a loverly little feltie to give to my Dad. Makes ya feel young again.
Taurus Feltie
So wander the web for wonderful felt crafts ideas and have fun.

Saturday, December 15, 2012

Geek fest ornaments

While surfing the interwebs I have encountered some really nifty cool homemade geek ornaments out there.  So here are my favorites:


1.  Amigurumi Pi ornaments.  I admit to loving amigurumi, I wish I could do it and there are so many cute designs out there.  Any little amigurmi can be an ornament.  These were made by alicia954.
2.  When in doubt go with Dr. Who.  Polymer clay is a great media and you can make your own Tardis, or my favorite, the Dalek.  I have seen many weeping angel tutorials on how to turn Barbie into something terrifying (well at least more terrifying than she already is) to put on top of your tree.  This Dalek was made by headofheather and she has many cute geek ornaments for sale at her Etsy store.
3.  For the science nerd we have these cute periodic table ornaments.  A flat blank ornament, paper mache or wood.  Some white paint, stick on letters, a little santa hat, and you are ready to create your very own ornaments.  These can be found over on Artfire if you wish to purchase instead of making your own.
4.  Pokeman is very popular and I found this round ornament made from sequins for sale on Etsy.  If you are a very patient person you can take any round idea like Angry Birds, the Death Star, or even logos from your favorite game like Zelda or WOW (Alliance or Horde) and create your own.
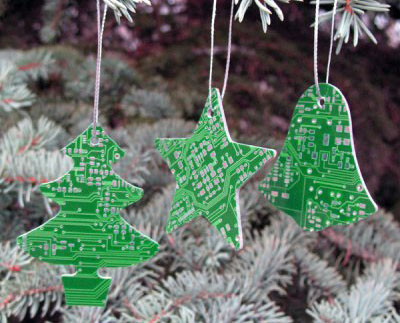
5. And last but not least using those old circuit boards.  Cut them in cute themed shapes, punch a hole and you are done.  Recycling at its best.  You can the same with the old CD's to decorate or just cut in great shapes. 
 
So have a very happy holiday and let your tree truly show who you are.

Monday, December 3, 2012

Salt Dough Ornaments

Tis the season, fa la la.  Time for the funs and joys of holiday crafts.  If you would like a fun family craft or are a new household making salt dough ornaments is and easy way to craft decorations for the tree that are personal and best of all inexpensive.  All you need are some salt, flour, and cookie cutters, and of course and oven.  Salt dough ornaments can be as simple or complicated as you would like.  To make the dough first:

             1 cup salt
             4 cups of flour
             1 1/2 cup of water (add gradually)


Combine the salt and flour then pour in the water gradually, stopping when it has become dough-like and not too sticky. There should be no residue left on your fingers when you touch it. Knead it on a floured surface for a few minutes to make it soft, workable and stretchy, like you would with any dough. This step is wonderful for strengthening those small hand muscles essential for writing and cutting!

Lay them on some greaseproof or baking paper and on a baking tray. Cook them on a VERY low heat (around 225 F) for 3-4 hours. Keep an eye on them and watch for scorching.  If the shapes are over 1cm thick then they will probably need to be turned over during cooking.

 Tips for decorating
             Cut hole for string before cooking – use a straw, toothpick, or dowel.  Depending on how big you want the hole.
             Since it is dough you can make small embellishments to decorate.
             Use stamps to add a personal touch, rub ink in the stamped part to bring out the color.
             Use stamps to add a personal touch
             Use scrap booking skill for extras, nifty ribbons and charms


Now the fun part of these ornaments as they are good for any holiday or religion.  I made some Hanukkah ornaments for a friend using Hanukkah cookie cutters.  This is a nice weekend project and you can create some beautiful personal gifts for friends and family.  So have fun.

Monday, November 19, 2012

Magic City Half Marathon Review

Well I ran my 3rd half marathon the other weekend, had worst time yet at 2:13, bleah.  I did not train long distance enough and around mile 10 my legs started being unhappy.  By the finish line I was shufflin.  Ah well, time to run longer.  So to post my comments about the race.
The Swag Bag - swag, we have no swag.  Nice dry-fit shirt, standard for many races now.  And that was it.  Not even a little packet of Bio-freeze.
The Weather - BEAUTIFUL.  November is tricky and it turned out to be a cloudless day.  Right nippy in the morning but warmed up a bit.  I get hot when I run so the jacket was off by mile 1.  Breeze was blowing so every now and then as I chugged along I got a nice cooling breeze.
The Course - mostly flat, some hills at the end.  I would have preferred the hills at the front and flat at the end.  Went by historic/interesting locations of Bham - Legion Field, Rickwood Field, RailRoad Park.  Pretty standard city running.  They had a 5K at the same time which merged with us for about a mile.  It was disconcerting to be jogging along and all of a sudden you run into a pack of 5k walkers.
The volunteers - They were GREAT.  At every drink stop they cheered, and smiled while handing out the Gatorade/water/gel packs.
The Police - at every intersection (and there were a lot). They put the runners 1st and traffic second.  Waving some cars through the breaks in the runners, and yelling at the idiots on phones while driving. Thanks very much to them.
The Spectators - what, was there a race that weekend?  Not so much, mostly at the finish line.
The Food - standard after race fare of bananas, cookies, etc.  Did not see any other water/Gatorade stations other than the water I was handed at the finish line.  Cold pizza was also served, not horrible.  There was a mini beer garden which had some samples, no beer was served on the course.
Entertainment - hubby was my chauffeur, big thanks, and he just milled around for a couple of hours.
The Medal - Design was OK, did not see an engraving station (I'm to cheap to do that anyway).

Overall it just seemed a long jumped up 5K style run.  It was only the 2nd year and they have to compete with the Mercedes Marathon for sponsors so I guess they are still feeling their way around.  It was a good test run for Disney to let me know I need to run more, but I don't plan on attending next year.

Saturday, November 17, 2012

Half Marathon Fun

As we count down to the Disney Princess Half Marathon 2013 I decided to do a half marathon this year. So tomorrow I will be running in the Magic City Half Marathon.  Pray for me.  I admit to not running as much as I should so may be walking most of this half.  We shall see.  I did create some cute half and full marathon items on Cafe Press - Gryphonwycks.  The bad part about designing for CafePress and Zazzle is the design size.  It would be nice to make one design that fit on all their merchandise but they have different dimensions and different bleed areas.  Highly annoying. So time to surf the interwebs to see how others have dealt with this issue.  Now off to do a bit of a run before the torture tomorrow.  Good luck to all the runners out there.

Friday, November 9, 2012

Owl Wedding Cake Toppers

While surfing the web for Cute Hoots to pin on Pinterest I came across some owl wedding cake toppers.  They appeared to be salt/pepper shakers that had been decorated.  I followed a link to a web site DIY cake toppers and the photos are amazing.  You take a simple unpainted bisque salt/pepper shaker:

Any unpainted salt/pepper would work and make a nice themed idea for a wedding.  Once you have your shakers you can then decorate as you like.  The photos below are from the website linked above, these people have some mad skill.  I also think this would make a cute idea for christmas presents to a couple.


Saturday, September 29, 2012

Thor's Hammer Ceramic Ornaments

I am not the greatest ceramicist in the world but I do love making things.  So I decided to make some Thor's Hammer ornaments for my Etsy Shop.  Mjolnir has become very popular with Chris Hemsworth playing a very hot Thor so normal people have become more aware of the Norse myths. The ornaments I crafted are ceramic and designed to hang in the house or on yee ol' Yule tree.  Since I cannot draw I ordered some very nice stamps from Highlander Celtic Stamps.  The stamps I ordered were unmounted to be flexible on clay and did have a nice deep etching so the patterns were visible once stamped.  I have another set of Celtic symbol stamps but these are only good for paper and are to detailed for pottery.
I do believe the stamps turned out nicely giving a good pattern to the hammers.  I must try with some different glazes.

Monday, September 10, 2012

Owl Pumpkins

So it is now September which means October (aka HALLOWEEN) is almost here.  So since I love owls I was wandering the internet for fun things to pin to my Cute Hoots pinterest board when I came across owl pumpkins. 
Of course Martha Stewart has some of the most interesting.


Another fascinating take using sunflower seeds can be found at Better Homes & Gardens


For traditional carving here are some links to interesting owl patterns:
If you find a really good pattern and have talent you can always use the fake pumpkins found at craft stores and keep a good pumpkin year after year.